Chapter 5
Fun with Sensors
สนุกกับตัวตรวจจับ
- A microcontroller becomes useful when it can sense the world around it.
- The micro:bit V2 has 5 built-in sensors: microphone, compass, accelerometer, thermometer and light sensor.
- In this chapter you build a hands-on project for every one of them.
5.1 Microphone & Sound Sensing ไมโครโฟนตรวจจับเสียง
- The micro:bit V2 has a built-in speaker and also a microphone.
- Three blocks use it. They are in the
Inputgroup.
on [loud] soundcomes in two kinds: on loud sound and on quiet sound. It fires when the sound goes above or below the threshold.set [loud] sound threshold to [128]sets the dividing line. The default is 128, on a scale from 0 to 255.sound levelgives the current level: 0 is quiet, 255 is the loudest.
5.1.1 Show the sound on a bar graph แสดงค่าเสียงผ่าน plot bargraph
- Test the microphone by drawing the level as a bar graph on the 5×5 LEDs with
plot bar graph of.
- Step 1 — Drag plot bar graph: take
plot bar graph offrom theLedgroup and put it insideforever. - Step 2 — Add sound level: take
sound levelfromInputand drop it into the value slot. - Step 3 — Set the maximum: type 255 as the "up to" value.
- The LEDs fill from the bottom row upward as the sound gets louder.
- Live telemetry: after you download the code, the LEDs rise and fall with the sound.
- With the USB cable connected through WebUSB, press Show console Device in MakeCode.
- You then see a live graph of the sound with the changing numbers.
💻 5.1.1 The microphone as a bar graph
See it in JavaScript
basic.forever(function () {
	led.plotBarGraph(input.soundLevel(), 255)
})
5.1.2 Clap counter with variable X ตรวจนับความดังเสียงแล้วเพิ่มค่า
- Goal: each loud clap adds 1 to a counter and shows it on the LEDs.
- Button A resets the counter to 0.
15-step assembly ขั้นตอนการต่อบล็อก
- Step 1 — Open Variables: open the
Variablesgroup. - Step 2 — Make a variable: click Make a Variable... to create a new one.
- Step 3 — Name it X: type X and press Ok.
- Step 4 — Add on button A: drag
on button A pressedfromInput, so button A can reset the counter. - Step 5 — Reset X to 0: put
set X to 0inside it. - Step 6 — Add show number: put
show numberfromBasicunder it. - Step 7 — Put X in it: drop the variable X into the
show numberslot. - Step 8 — Add forever: drag
foreverfromBasic. - Step 9 — Add if then: put
if thenfromLogicinsideforever. - Step 10 — Add a comparison: drop a
0 < 0block fromLogicinto the if. - Step 11 — Change to greater than: change the symbol to >.
- Step 12 — Set the threshold: change the number on the right to 128.
- Step 13 — Add sound level: drop
sound levelfromInputon the left of the symbol. - Step 14 — Increment X: put
change X by 1inside the if, so X goes up by 1 for each loud sound. - Step 15 — Show the count: right-click
show number X, choose Duplicate, and snap the copy underchange X by 1.
💻 5.1.2 Clap counter — polling the sound level in forever
See it in JavaScript
let X = 0
input.onButtonPressed(Button.A, function () {
	X = 0
	basic.showNumber(X)
})
basic.forever(function () {
	if (input.soundLevel() > 128) {
		X += 1
		basic.showNumber(X)
	}
})
5.1.3 Counting fast claps: event vs polling ตรวจนับความดังเสียงแบบต่อเนื่อง
- In 5.1.2 the program checks the sound, then waits for
show numberto finish before it checks again. - This is called polling: the code keeps asking "is it loud?".
- If claps come quickly one after another, some fall in the gaps and are missed.
- Fix: use an event. The
on loud soundblock is triggered by the hardware.
💻 5.1.3 The same counter as an event — on loud sound
See it in JavaScript
let X = 0
input.onButtonPressed(Button.A, function () {
	X = 0
	basic.showNumber(X)
})
input.onSound(DetectedSound.Loud, function () {
	X += 1
	basic.showNumber(X)
})
💡 The technical difference
- With fast claps, a program using
on loud soundkeeps every trigger from the hardware. - It handles them straight away, without waiting for an earlier command in a loop to finish.
5.2 Electronic Compass ใช้งานเข็มทิศอิเล็กทรอนิกส์
- Every micro:bit, from the first version to today, has a sensor for magnetic fields. It measures the Earth's magnetic field.
- Read it with
show numberplus thecompass headingblock fromInput. - The heading is from 0 to 359 degrees. North is 0.
5.2.1 Read the heading in degrees ทดลองอ่านค่าองศา
- Step 1 — Place show number: drag
show numberfromBasicintoforever. - Step 2 — Add compass heading: drop
compass heading (°)fromInputinto it.
Tilt calibration (first run):
- After the download, the LEDs scroll "TILT".
- Tilt the board in every direction until every LED is lit. This calibrates the compass.
- When it is done, a smiley face appears for a moment.
- Then the number shows the direction the top of the board is pointing.
💻 5.2.1 Reading the heading in degrees
See it in JavaScript
basic.forever(function () {
	basic.showNumber(input.compassHeading())
})
5.2.2 Turn degrees into N, E, S and W แปลงค่าองศาเป็นตัวอักษรย่อประจำทิศ
- A letter is easier to read than a number.
- The program picks a letter by checking which range the heading falls in.
12-step cardinal-direction ladder
- Step 1 — Make a variable: open
Variablesand click Make a Variable... - Step 2 — Name it degree: call it degree.
- Step 3 — Meet its blocks: the editor adds
degree,set degree toandchange degree by. - Step 4 — Place set degree: drag
set degree tointoforever. - Step 5 — Read the heading: drop
compass heading (°)fromInputinto it. - Step 6 — Add if then else: drag
if then elsefromLogicunderneath. - Step 7 — Add a comparison: put a
0 < 0block fromLogicin the if. - Step 8 — Add degree: drop the variable
degreeon the left side. - Step 9 — Set 45: type 45 on the right.
- Step 10 — Show "N": put
show string "N"in the then part (under 45° is north). - Step 11 — Click the plus: press
+on the if block to add another test. - Step 12 — Finish the ladder: add the other tests, as in the full program below.
Complete compass program
💻 5.2.2 Degrees turned into N, E, S and W
See it in JavaScript
let degree = 0
basic.forever(function () {
	degree = input.compassHeading()
	if (degree < 45) {
		basic.showString("N")
	} else if (degree < 135) {
		basic.showString("E")
	} else if (degree < 225) {
		basic.showString("S")
	} else if (degree < 315) {
		basic.showString("W")
	} else {
		basic.showString("N")
	}
})5.3 3-Axis Accelerometer & Tilt Sensing ตรวจจับความเอียง
- The accelerometer (ตัวตรวจจับความเร่ง) is another very popular sensor. It lets you build things like a tilt meter.
- It has 3 axes: x, y and z. It senses acceleration, tilt and movement.
- Range: ±2G. It reports in milli-G (mG).
1000 mG = 1 G, and 1 G is about9.81 m/s².
5.3.1 Test the accelerometer: 11 gestures ทดสอบตัวตรวจจับความเร่งอย่างง่าย
- MakeCode's
on [gesture]block knows 11 movements. - In this test, each gesture shows its own number.
| Gesture option | What you do with the board | Number shown |
|---|---|---|
shake | Shake the micro:bit. | 0 |
logo up | Stand the board up with the logo on top. | 1 |
logo down | Turn the board over so the logo is at the bottom. | 2 |
screen up | Lay the board flat, screen facing the sky. | 3 |
screen down | Lay the board face down, screen toward the floor. | 4 |
tilt left | Tilt the board to the left. | 5 |
tilt right | Tilt the board to the right. | 6 |
free fall | Let the board drop straight down (free fall). | 7 |
3g, 6g, 8g | Three kinds of hard knock. They complete the 11 gestures but are not used in this test. | none |
💻 5.3.1 Gesture test — every movement shows its own number
See it in JavaScript
input.onGesture(Gesture.Shake, function () {
	basic.showNumber(0)
})
input.onGesture(Gesture.LogoUp, function () {
	basic.showNumber(1)
})
input.onGesture(Gesture.TiltLeft, function () {
	basic.showNumber(5)
})
input.onGesture(Gesture.TiltRight, function () {
	basic.showNumber(6)
})
input.onGesture(Gesture.FreeFall, function () {
	basic.showNumber(7)
})
5.3.2 Show x and y on the LEDs: a 2D spirit level แสดงผลแนวแกน X และ Y ด้วย LED 5x5
- Use
acceleration (mg)to read the tilt along x and y. - Keep the readings in variables X and Y, then light one LED with
plot x y. - Tilt the board and the lit LED slides like the bubble in a carpenter's level.
The maths, in three steps
- Step 1 — Shift the range: the raw reading runs from
-1023to+1023. Add 1023 and it runs from0to2046. - Step 2 — Divide by 420:
2046 ÷ 420 ≈ 4.87, so the result runs from 0 to about 4.87. - Step 3 — Drop the decimals: that leaves the whole numbers 0, 1, 2, 3, 4, which are exactly the 5 LED columns.
- Tilt the board left: the LED moves to the far left. Tilt it right: it moves right, like the bubble in a spirit level.
9-step build
- Step 1 — Open Variables: open
Variablesand click Make a Variable... - Step 2 — Create X and Y: make X for the x reading and Y for the y reading.
- Step 3 — Add clear screen: put
clear screenfromBasicinforever. - Step 4 — Add set X to: snap
set X tounderneath. - Step 5 — Nest the maths: put a
0 + 0block inside a0 / 0block fromMath. - Step 6 — Attach it: drop that calculation into the value slot of
set to. - Step 7 — Formula for X: add
acceleration (mg) xfromInputto make(acceleration (mg) x + 1023) / 420. - Step 8 — Formula for Y: repeat step 7 for Y, using
acceleration (mg) y. - Step 9 — Add plot x y: snap
plot x [X] y [Y]fromLedat the end to light that LED.
💻 5.3.2 Spirit level — the bubble follows the tilt
See it in JavaScript
let X = 0
let Y = 0
basic.forever(function () {
	basic.clearScreen()
	X = (input.acceleration(Dimension.X) + 1023) / 420
	Y = (input.acceleration(Dimension.Y) + 1023) / 420
	led.plot(X, Y)
})5.4 Temperature Sensing การตรวจจับอุณหภูมิ
- The micro:bit has no separate thermometer. It uses a temperature sensor inside the microcontroller chip.
- The chip's heat is equal to or close to room temperature.
- Warmer air heats the chip's case, and the heat passes on to the sensor inside.
- The chip warms itself a little while it runs, so the reading can be a bit warm.
5.4.1 Show the temperature แสดงค่าอุณหภูมิอย่างง่าย
- Step 1 — Place show number: drag
show numberintoforever. - Step 2 — Add temperature: drop
temperature (°C)fromInputinto it.
5.4.2 An overheat siren สร้างเงื่อนไขจากค่าอุณหภูมิที่กำหนด
- Goal: when the temperature goes above a set value, play music from the speaker.
- Step 1 — Show the temperature:
show number (temperature (°C))displays it on the LEDs. - Step 2 — Add a condition: add an
ifblock and a comparison fromLogicset to >. - Step 3 — Set the 30 °C threshold: put
temperature (°C)in the comparison and type 30. - Step 4 — Add the sound: put
play sound giggle until doneinside the if.
- Testing the alarm: after the download, the LEDs show the temperature.
- When it goes above 30 °C, music plays from the speaker straight away.
- To test it, warm the chip gently with your hand or a warm (not hot) object.
💻 5.4 Thermometer with an alarm above 30 °C
See it in JavaScript
basic.forever(function () {
	basic.showNumber(input.temperature())
	if (input.temperature() > 30) {
		music.play(music.builtinPlayableSoundEffect(soundExpression.giggle), music.PlaybackMode.UntilDone)
	}
})5.5 Light Sensing via 5x5 LEDs การตรวจจับแสง
- The micro:bit has no separate light sensor.
- Instead, 9 of the LEDs do the job of a light sensor.
- This is clever but not very sensitive, so treat the numbers as a rough guide.
How it works physically:
- The LEDs are reverse-biased (ไบแอสกลับ) while sensing.
- White light passing through the LED's case reaches the semiconductor junction inside, and a small current flows.
- That makes a voltage on a pin of the main microcontroller.
- The result is a number from 0 (completely dark) to 255 (very bright).
5.5.1 Show the light level แสดงค่าแสงด้วย LED 5x5
- Use the
light levelblock fromInputto read the brightness.
💻 5.5.1 Reading the light level, 0 to 255
See it in JavaScript
basic.forever(function () {
	basic.showNumber(input.lightLevel())
})
5.5.2 Switch a sound with light: a light alarm เปิดปิดไฟด้วยการตรวจจับแสง
- 5.5.1 only reads the light. Here we use the reading in a condition.
- When the light level goes above a set value, a sound plays.
- Step 1 — Add the test: use
if thenand a comparison fromLogic. - Step 2 — Compare with 128: drop
light levelfromInputinto the comparison and compare it with 128. - Step 3 — Set the volume: add
set volume 255to fix how loud the sound is. - Step 4 — Play the sound: add
play sound giggle until done, or pick another tune.
💻 5.5.2 Light alarm — it sounds when the light goes above 128
See it in JavaScript
basic.forever(function () {
	if (input.lightLevel() > 128) {
		music.setVolume(255)
		music.play(music.builtinPlayableSoundEffect(soundExpression.giggle), music.PlaybackMode.UntilDone)
	}
})- Testing the light alarm: point the board at a light, or shine a torch on the LEDs.
- The light level rises above 128 and the music plays from the speaker.
- Cover the LEDs with your hand and the music stops.
Interactive micro:bit V2 Sensor Architecture
Hover over or tap any sensor on the real photograph of the back of the micro:bit V2.
micro:bit V2 Onboard Environmental Sensors Suite
Interactive Map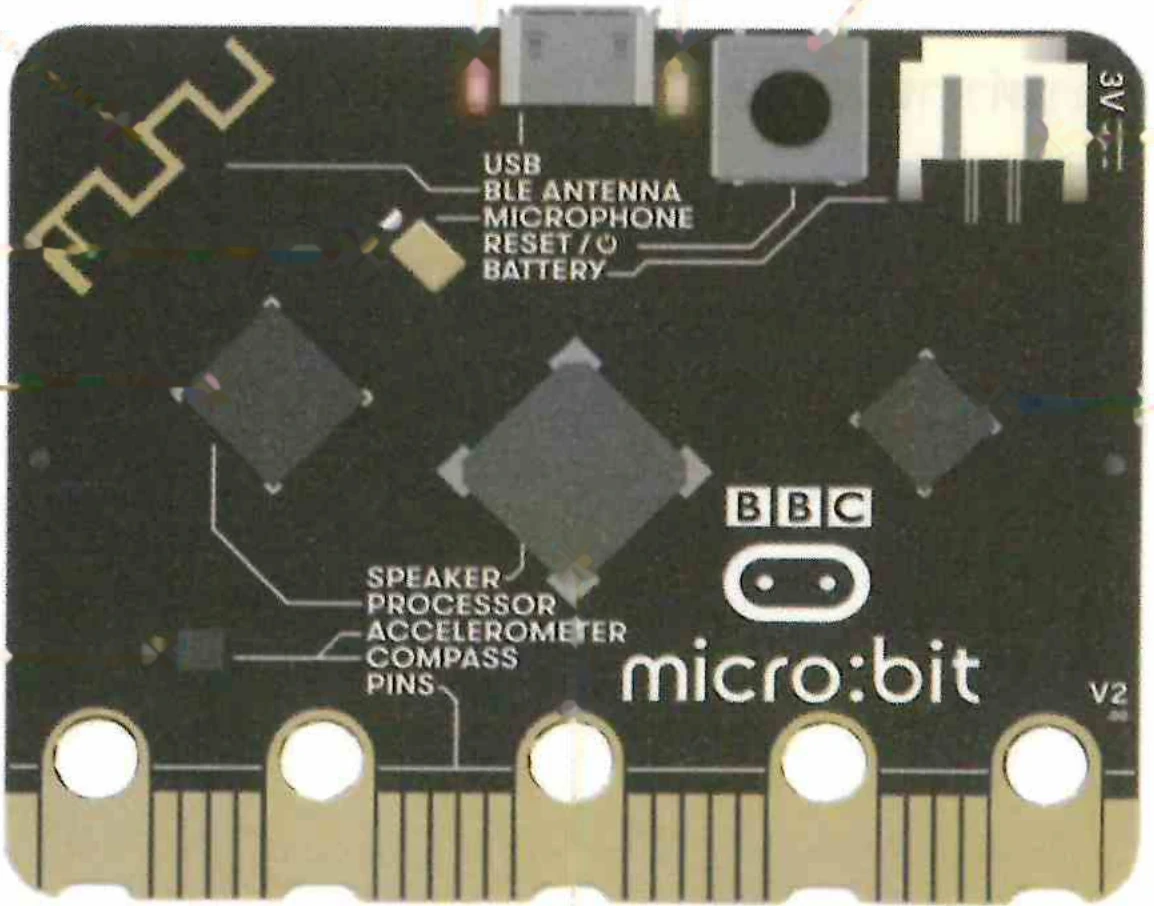
Hover or tap the SPU0410 Mic, LSM303AGR Compass/Motion chip, nRF52833 Core Thermometer, or Speaker.
Chapter 5 Review & Self-Check
- Check what you know about sound thresholds, the clap-counter variable, compass calibration, the accelerometer formula, the chip thermometer and light sensing with LEDs.